
“Do you really need a cloud for that?” or: How I spent my 2020 summer vacation
Background - Why?
Most of the applications I build at work end up running in Azure, so to get a break from that environment I decided I wanted to try to host my side-projects in my own private kubernetes cluster. In this series of blog post I will show you how to set up your own kubernetes cluster using some Raspberry Pis.
In this first post we will prepare the Raspberry Pis and install kubernetes.
The setup
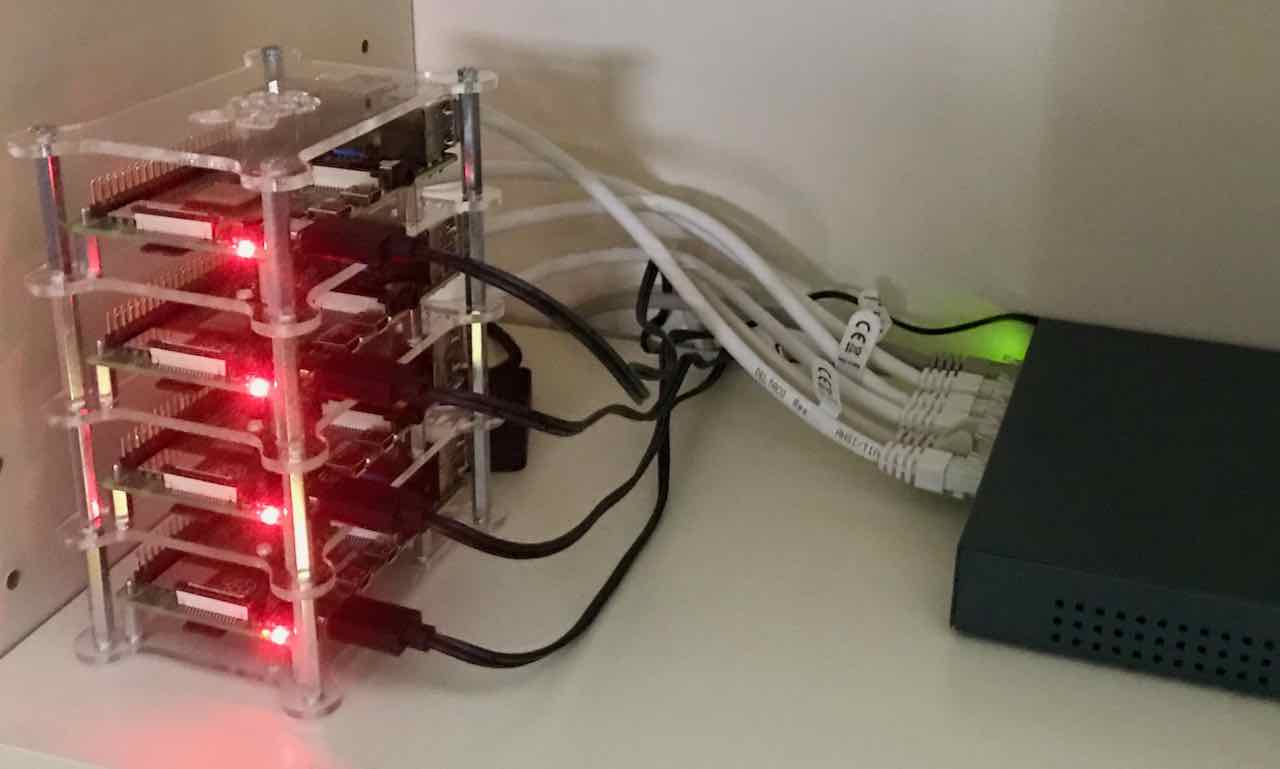
The cluster I am building will consist of 4 computers, a main node and 3 worker nodes. The main node is an Raspberry Pi 4 with 8GB memory and the workers are of thee 4 GB version. We are going to install the 64-bit version of Ubuntu, so we are going to need to use v3 or v4 Raspberry Pis. You don’t have to have a multi-node cluster of course, for a simple dev/test cluster, a single-node can be enough. I am using a TP-Link TL-SG108 8-port switch to connect all the nodes to my network, and a WD My Passport SSD 512GB for storage.
1. Installing Ubuntu
For my main node I am using a 128 GB sized SD-card. It turns out there are some issues when using a SD-card with a size > 32GB. I will describe the fix neeeded below, but my recommendation is to just use a 32 GB card, since we will be adding external storage anyways.
Installation
To install Ubuntu from my mac I used the Raspberry Pi Imager, but any sd-card imager works fine. I am installing Ubuntu 20.04 LTS.
When you first start up the Raspberry Pi after with the new Ubuntu image it will take a short while before the default ubuntu user is created. After a minute or so you should be able to login with user: ubuntu, password ubuntu. You will be prompted to change the password.
If using an SD-card > 32 GB
Trying to use an SD-card larger than 32 GB caused me to run into some weird issues. Sometimes it seemed to work fine, but then suddenly when rebooting the Raspberry Pi just wouldn’t start. After a lot of reading I ended up on this blog post that solved my issue: I had to update config.txt file in the /boot/ partition.
So I connected the SD-card to the card-reader on my mac again, and updated config.txt to make sure it included:
# Enable audio (loads snd_bcm2835)
dtparam=audio=on

[pi4]
arm_64bit=1
enable_gic=1
armstub=armstub8-gic.bin
If you’re using a Raspberry Pi 3, use the [pi3]-header instead.
Then your Raspberry Pi should be able to handle your large SD-card when you boot it up again.
2. Update hostname and setup mDNS
Next we are going to change the hostname and add mDNS to make it a little easier to connect to.
The hostname can be changed by editing /etc/hostname, a reboot is required.
mDns can be used to make your Raspberry Pis available on the .local domain. To enable it on the Raspberry Pi, just install the avahi-daemon, and we might as well install any available updates at this point:
sudo apt-get update
sudo apt-get upgrade
sudo apt-get install avahi-daemon
If you’re running mac os-x the .local-domain should now just work out of the box and your raspberry pi will be reachable on <hostname>.local for whatever hostname you changed to in /etc/hostname. If you are running windows you need to install the bonjour-service, see the “What Do I Neeed?”-section here for instructions.
3. Setup SSH keys
We don’t want to be logging in with username/password all the time when accessing our Raspberry Pis, so we are going to setup ssh login. If you do not already have an ssh-key on your client computer you can create one, on a mac you would run: ssh-keygen.
Then we copy the key to the raspberry pi using ssh-copy-id:
ssh-copy-id username@remote_host
Now verify that you can login to the Raspberry Pi using ssh: ssh username@remote_host.
If we want we can also disable username/password login altogether and only allow login with ssh keys. We do this by editing /etc/ssh/sshd_config and setting PasswordAuthentication no. For this take effect we need to restart the ssh-service: sudo systemctl restart ssh
4. Setup nfs-share
Most likely you are going to want some shared external storage that your kubernetes nodes can use. For this we are going to setup a nfs-share using an external ssd-drive. If you are running a single node cluster you can skip this step and use a kubernetes hostpath volume instead of nfs volume for your pods.
Main-node setup
First we need to find our external disk, we can do this using sudo lsblk
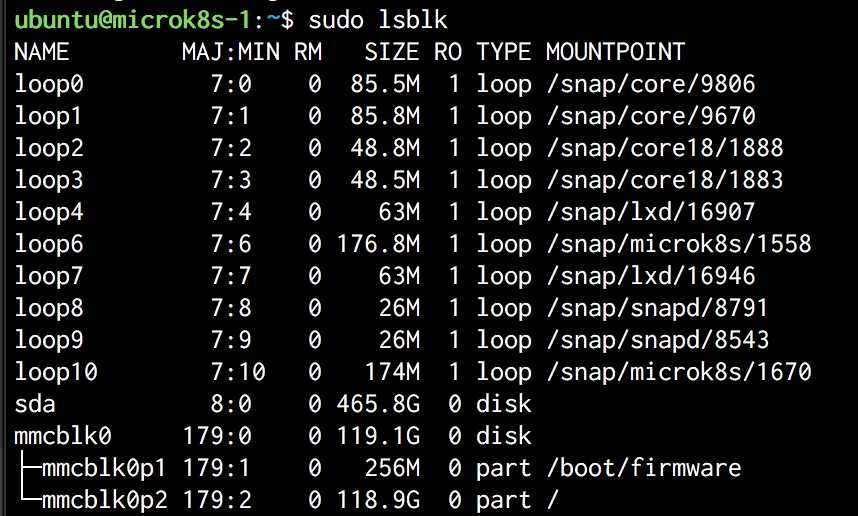
The disk I am looking for in this case is a 500 GB external drive, and we can see that the name is sda.
First I want to mount it locally on the main-node to path I want to call /media/expansion1:
mkdir /media/expansion1
mount —bind /dev/sda /media/expansion1
Then additionally I want to mount it at /export/share1 which is going to be the path that is exported as my nfs-share.
mkdir /export/share1
mount —bind /media/expansion1 /export/share1
Now we can install the nfs-server on the main node:
sudo apt install nfs-kernel-server
Then we edit /etc/exports with the following:
/export/share1 192.168.50.200/29(rw,sync,no_subtree_check)
The ip-range 192.168.50.200/29 is the network for my cluster to which I am exporting the path. For more information on the settings, see here.
Worker-node setup
To setup the worker nodes as nfs-client we need to do the following:
sudo apt install nfs-common
mkdir /share1
mount -t nfs -o proto=tcp,port=2049 192.168.50.200:/export/share1 /share1
This will install the nfs-client, create a local path /share1 and then setup a mount using nfs to bind /export/share1 on the nfs-server to the local path /share1.
If you have any errors in your nfs-setup you will get an error when trying to run the mount command above. In that case, add the verbose flag -v to get more information. In my case it is usually an access denied-error due to me mixing up the paths I am trying to mount.
If you don’t get any error messages, go ahead and try adding and modifying a file on the nfs-share to verify the setup.
If you were to restart the nfs-client computer at this point it would lose the connection to the nfs-share, though. And that’s not what we want, so to avoid this we can edit /etc/fstab and add:
192.168.50.200:/export/share1 /share1 nfs defaults 0 0
Now the nfs-share will be available even after a reboot.
5. Install kubernetes
We are going to be installing microk8s which is described as “The smallest, simplest, pure production K8s. For clusters, laptops, IoT and Edge, on Intel and ARM.”
To be able to install microk8s on our Raspberry Pis there is an additional fix we need to do:
Edit /boot/firmware/cmdline.txt and add:
cgroup_enable=memory cgroup_memory=1
Now we are ready to install microk8s which we will do using snap. We need to install microk8s on all nodes, so repeat the following steps on all your nodes:
sudo snap install microk8s --classic --stable
Here I am using the --stable channel, many others are available.
Then we need to setup some permissions for microk8s:
sudo usermod -a -G microk8s ubuntu
sudo chown -f -R ubuntu ~/.kube
Microk8s comes with a bunch of add-ons (although some of these are not available on arm64 that we are running on the Raspberry Pi). We only need to activate these on the main node, and for now we will only enable the following:
microk8s.enable helm3 storage dns registry
For good measure we can reboot all the nodes at this point. After a reboot you can check the status of the microk8s installation by running microk8s.status.
Connecting nodes to the cluster
To add a node to the cluster run the following command on the main-node:
microk8s add-node
The output from this command will provide you with a snippet to run on the node you want to add. Just run it, and as simple as that the node will be added to the cluster. Repeat for all your nodes.
Now you should have your own kubernetes cluster up and running!
Using kubectl remotely
As the final step in this blog post we are going to setup kubectl on our local computer to be able to connect to our new kubernetes cluster.
If you do not already have kubectl installed locally, see instructions here.
We need to get the kubectl configuration and copy it to our local computer. Login to the main node and run:
microk8s.kubectl config view --raw > config
This will save the configuration to a file config. You can now copy this file to your local kubectl configuration folder (~/.kube by default). Be careful not to overwrite any existing config files that you are using. If you need to use multiple configurations / contexts for connecting to multiple clusters, see the documentation.
Now it should be possible to run kubectl from your local computer. Try kubectl get nodes to list all the nodes in your cluster.
Next steps
In the next blog post we will deal with exposing our cluster to the world by installing a load-balancer metallb, setting up an nginx-ingress resource and use cert-manager to automatically configure ssl-certificates.